Setup Google Tag Manager With Red Bee App
Prerequisites
Make sure you have the following items on this list setup and working before starting this how to guide.
- Google Tag Manager Account. Read more on setup here
- Google Analytics 4 Account, a data stream and a measurement ID. Find the guide on how to set it up here.
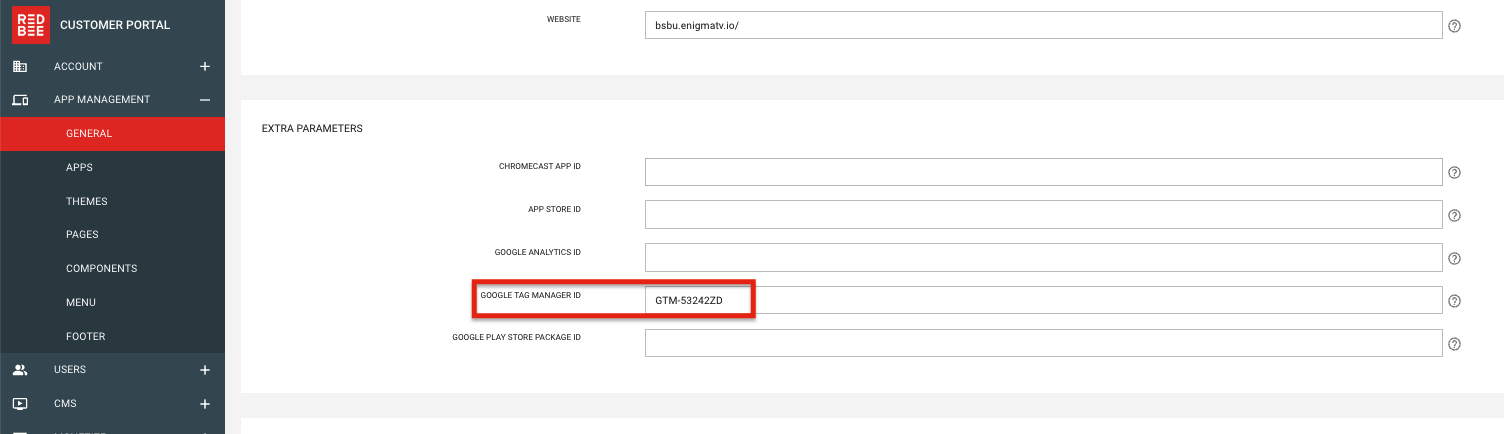
- Google Tag Manager ID, properly set in Customer portal
 - Google Tag Manager Config Tag that holds the Google Analytics 4 measurement ID (Set in Google Tag Manager container)
Troubleshooting:
- If you have created tags in Google Tag Manager, make sure to publish your changes for them to take effekt. 1.1 If you want instant feedback that everything is properly set up, you can use the preview mode inside Google Tag Manager.
- It could take up to 48h for your data to be exposed in Google Analytics 4 after being sent from Google Tag Manager.
2.1 under
Configure=>Debug View, you can test that your data is recieved from Google Tag Manager preview mode.
The Data Layer
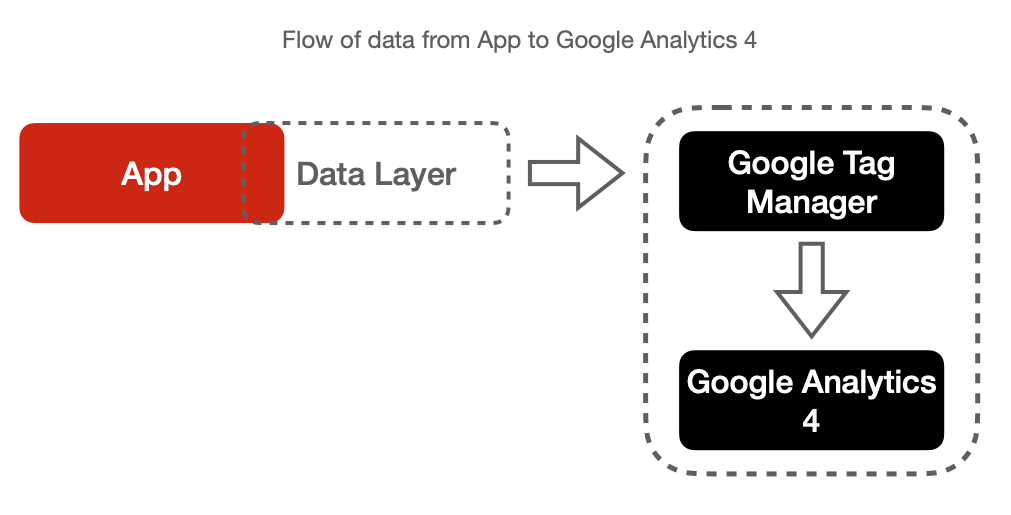
The Data Layer acts as a middle hand between the RedBee app and Google Tag Manager. It connects to the correct container using a Google Tag Manager container ID and once the ID is set in the customer portal, the RedBee app will be connected to that container. When a specified event occurs in the app; It could be a click, scroll or custom event, data is being pushed from the app to the data layer. Whenever there is a change to the data layer, the data layer will forward its data to Google Tag Manager. From Google tag manager you can set up triggers to act on keys in the data layer and by doing so, collect data to your data stream in your Google Analytics 4 account.
Automatically collected events with Google Analytics 4 enhanced measurement
When using Google Analytics 4 with enhanced measurement enabled, there are a multitude of events that will be collected automatically by Google Tag Manager. For example they include outbound clicks (i.e. external link in herobanner items or menu), link clicks, scroll and scroll depth.
- See a full list of the automatically collected events here
Events implemented by RedBee
There are, however, events that are not as easily collected to cover the entire user journey in the context of the RedBee platform and they include:
- Sign up / Log in
- Component item click / Menu item click
- CTA purchase flow → CTA selected product offering → abort / success
- CTA watch now (will be tracked as play page view otherwise)
- CTA share
- CTA favourite
- CTA follow tag
- CTA add to calendar
- Component item click
The RedBee app will capture these events by pushing data objects to the data layer when the user interacts with your app.
By doing so, you can capture this data using a custom event tag in Google Tag Manager.
The following custom keys (event) below can be used to trigger custom tags. The data object will always contain the event and userLocation information.
login
Pushes the following object to the data layer once the user successfully logs in.
{
  event: "login";
  userLocation: string;
  method: "oauth" | "firebase" | "userAccount";
}
signup
Pushes the following object to the data layer once the user successfully signs up.
{
  event: "signup";
  userLocation: string;
  method: "oauth" | "firebase" | "userAccount";
}
assetNavigate
Pushes the following object to the data layer once the user clicks on either a hero banner- /categories- /carousel- /grid- or list card. attn!: there will only be one item in the array of items.
  {
    event: "assetNavigate";
    userLocation: string;
    itemListId: string; //ID of the component
    itemListName: string; //Name of the component
    items: [
      itemId: string; //ID of the Asset
      itemName: string; //Name of the Asset
      type: "heroBanner" | "categoriesCard" | "carouselItem" | "gridItem" | "listItem";
    ];
  }
assetInteraction
Pushes the following object to the data layer once the user follows, unfollows, adds asset to calendar or add an asset to favorites
{
  event: "assetInteraction";
  userLocation: string;
  action: "watch" |
    "favorite" |
    "unFavorite" |
    "followTag" |
    "unFollowTag" |
    "addToCalendar";
  itemId: string; //ID of either asset or tag;
}
beginCheckout
Pushes the following object to the data layer once the user selects a product offering after beginning a purchase. attn!: there will only be one item in the array of items.
  {
    event: "beginCheckout";
    userLocation: string;
    itemId: string; //ID of the Asset
    items: [
      itemId: string; //ID of the product offering
      itemName: string; //Name of the product offering
      itemType: "rental" | "subscription" | "purchase" | "event"
      currency: string; //ISO 4217 code
      value: number; //price without fraction digits
    ]
  }
purchase
Pushes the following object to the data layer once the user completes a purchase. attn!: there will only be one item in the array of items.
  {
    event: "purchase";
    userLocation: string;
    transactionId: string; //ID of purchase
    currency: string; //ISO 4217 code
    value: number; //price
    items: [
      itemId: string; //ID of Product offering
    ]
  }
share
Pushes the following object to the data layer once the user clicks on a share button. attn!: This only track the intent of sharing, it does not know if the user actually shared the link.
  {
    event: "share";
    userLocation: string;
    method: "native" | "twitter" | "facebook";
    contentType?: "asset";
    itemId: string; //ID of the Asset
  }
Connect your Google Analytics 4 to your Google Tag Manager
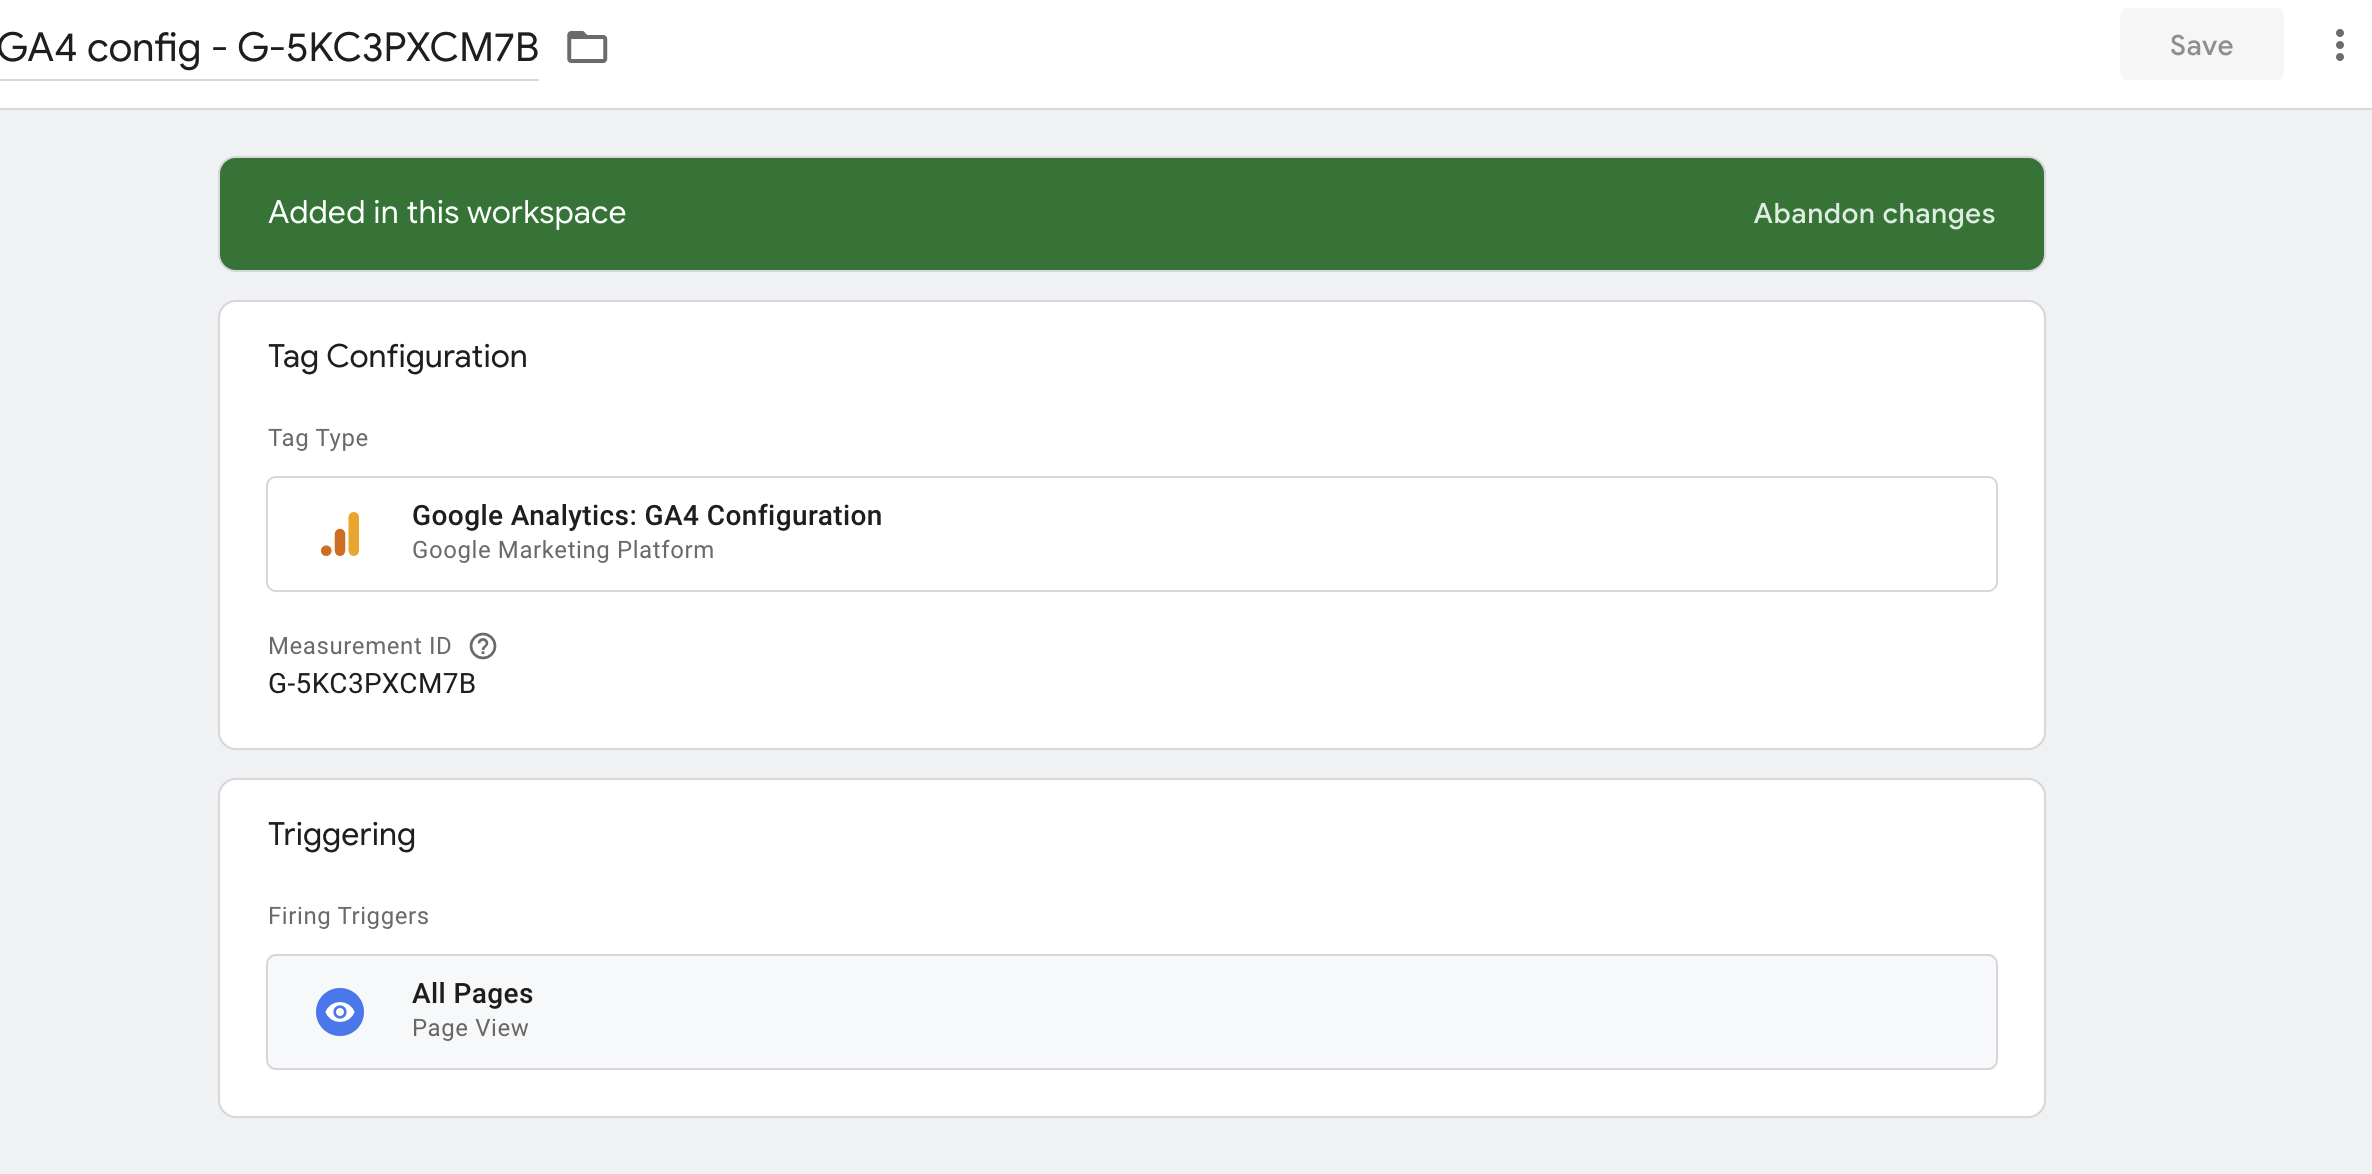
You need to setup a configuration tag in Google Tag Manager containing your measurementId from Google Analytics 4, it should be setup to fire on all page loads. This will connect your Google Tag Manager ID with Google Analytics 4.
Setting up data layer variables
We would recommend you to setup the following Data Variables to more easily set up tags.
- Go to your tag manager workspace.
- Click on
Variables - Click on
New - Choose a name for your varible in the top left corner where it says "Untitled Variable". We prefixed it with
dlv -but that is up to you. - Click on Variable Configuration.
- Select
DataLayer Variable - type the data variable name from the table below that corresponds with the value you want to capture. i.e
items.0.itemId - Keep the default "Data Layer Variable Version - version 2"
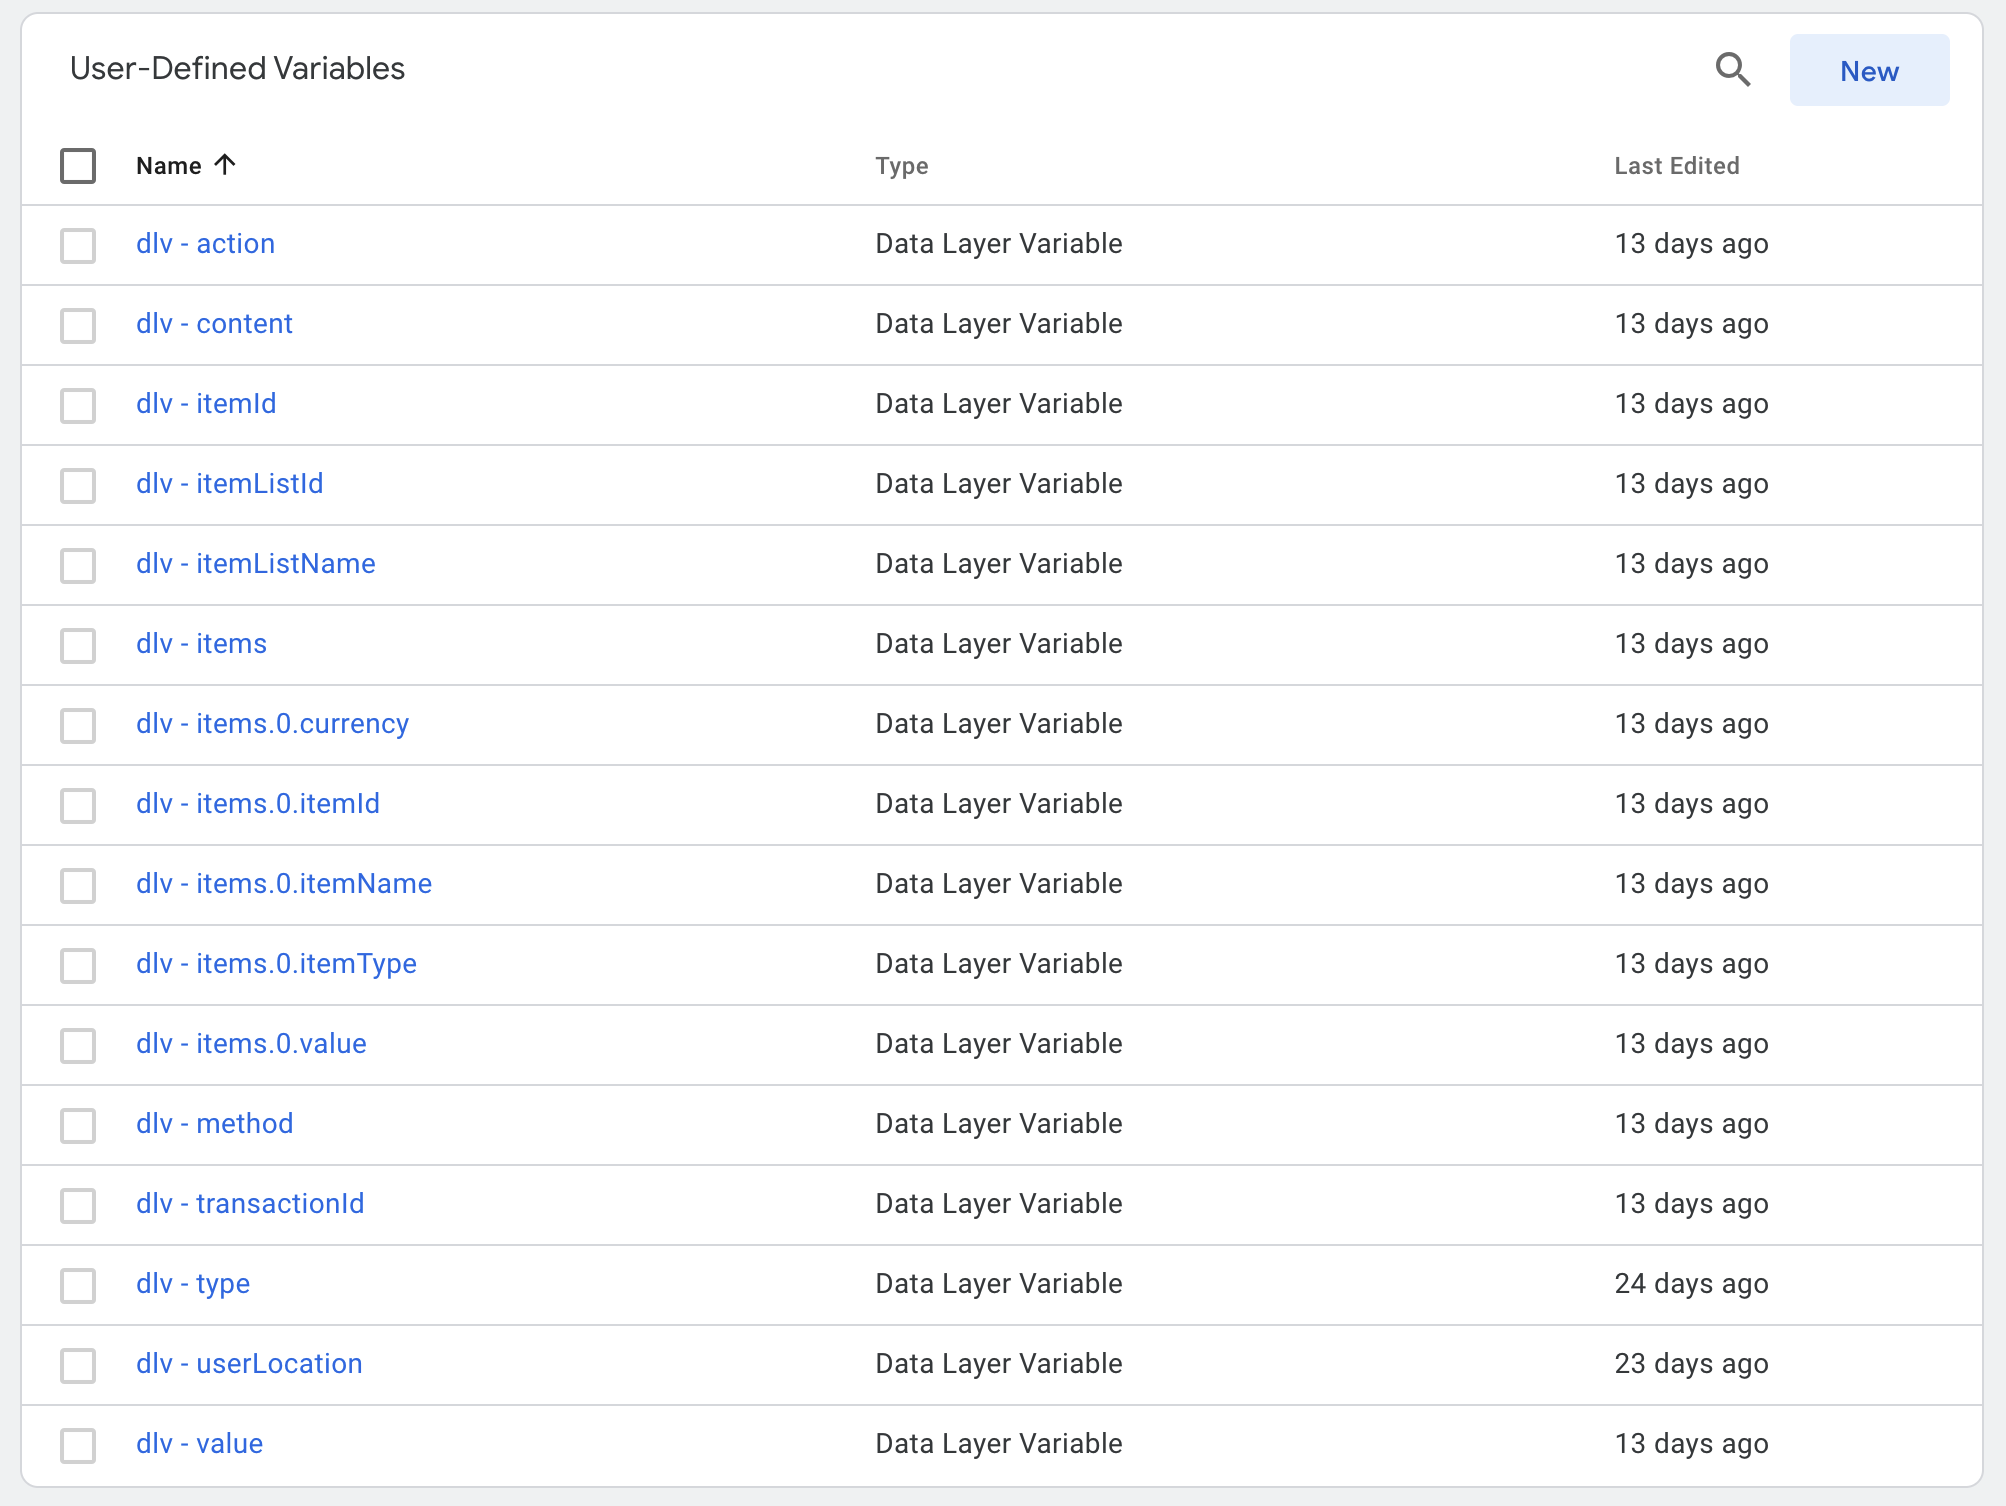
When you are done, it should look something like this:
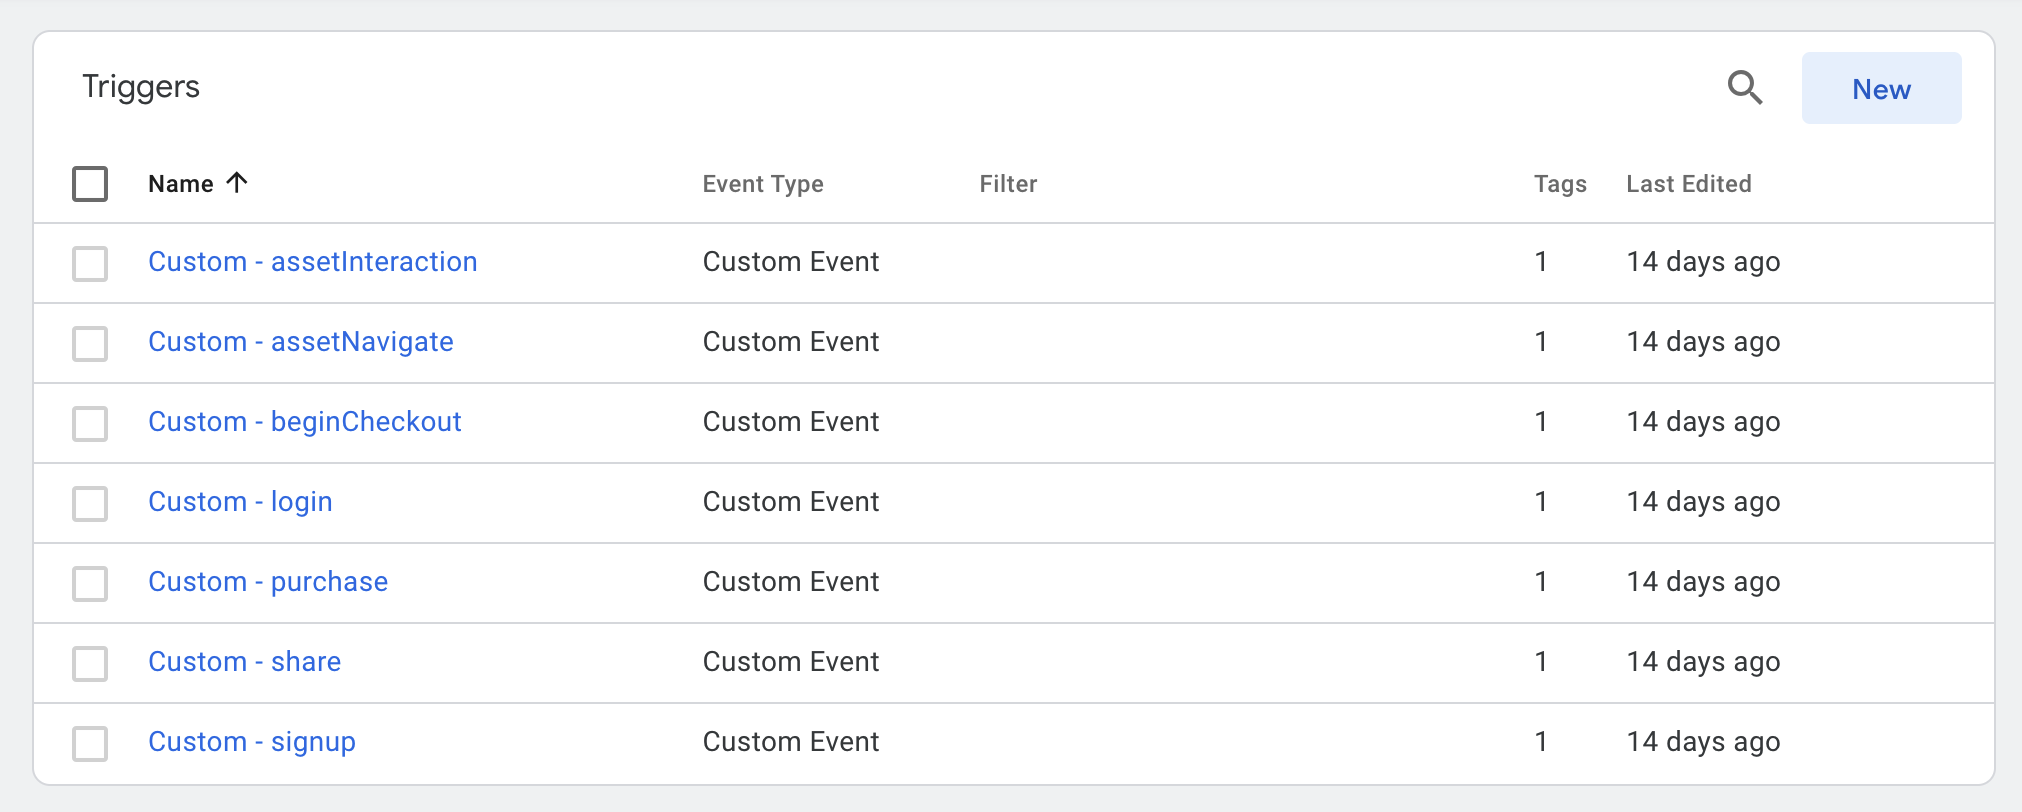
Setting up custom events.
- Go to your tag manager workspace.
- Click on
Triggers - Click on
New - Choose a name for your trigger in the top left corner where it says "Untitled Trigger". We prefixed it with
Custom -but that is up to you. - Click on Trigger Configuration.
- Select
Custom Event. - Type the event name that you want to fire a tag on. Make sure it matches the typing from the table further down. i.e
assetNavigate - Keep the default "This trigger fires on All Custom Events".
When you are done, it should look something like this:
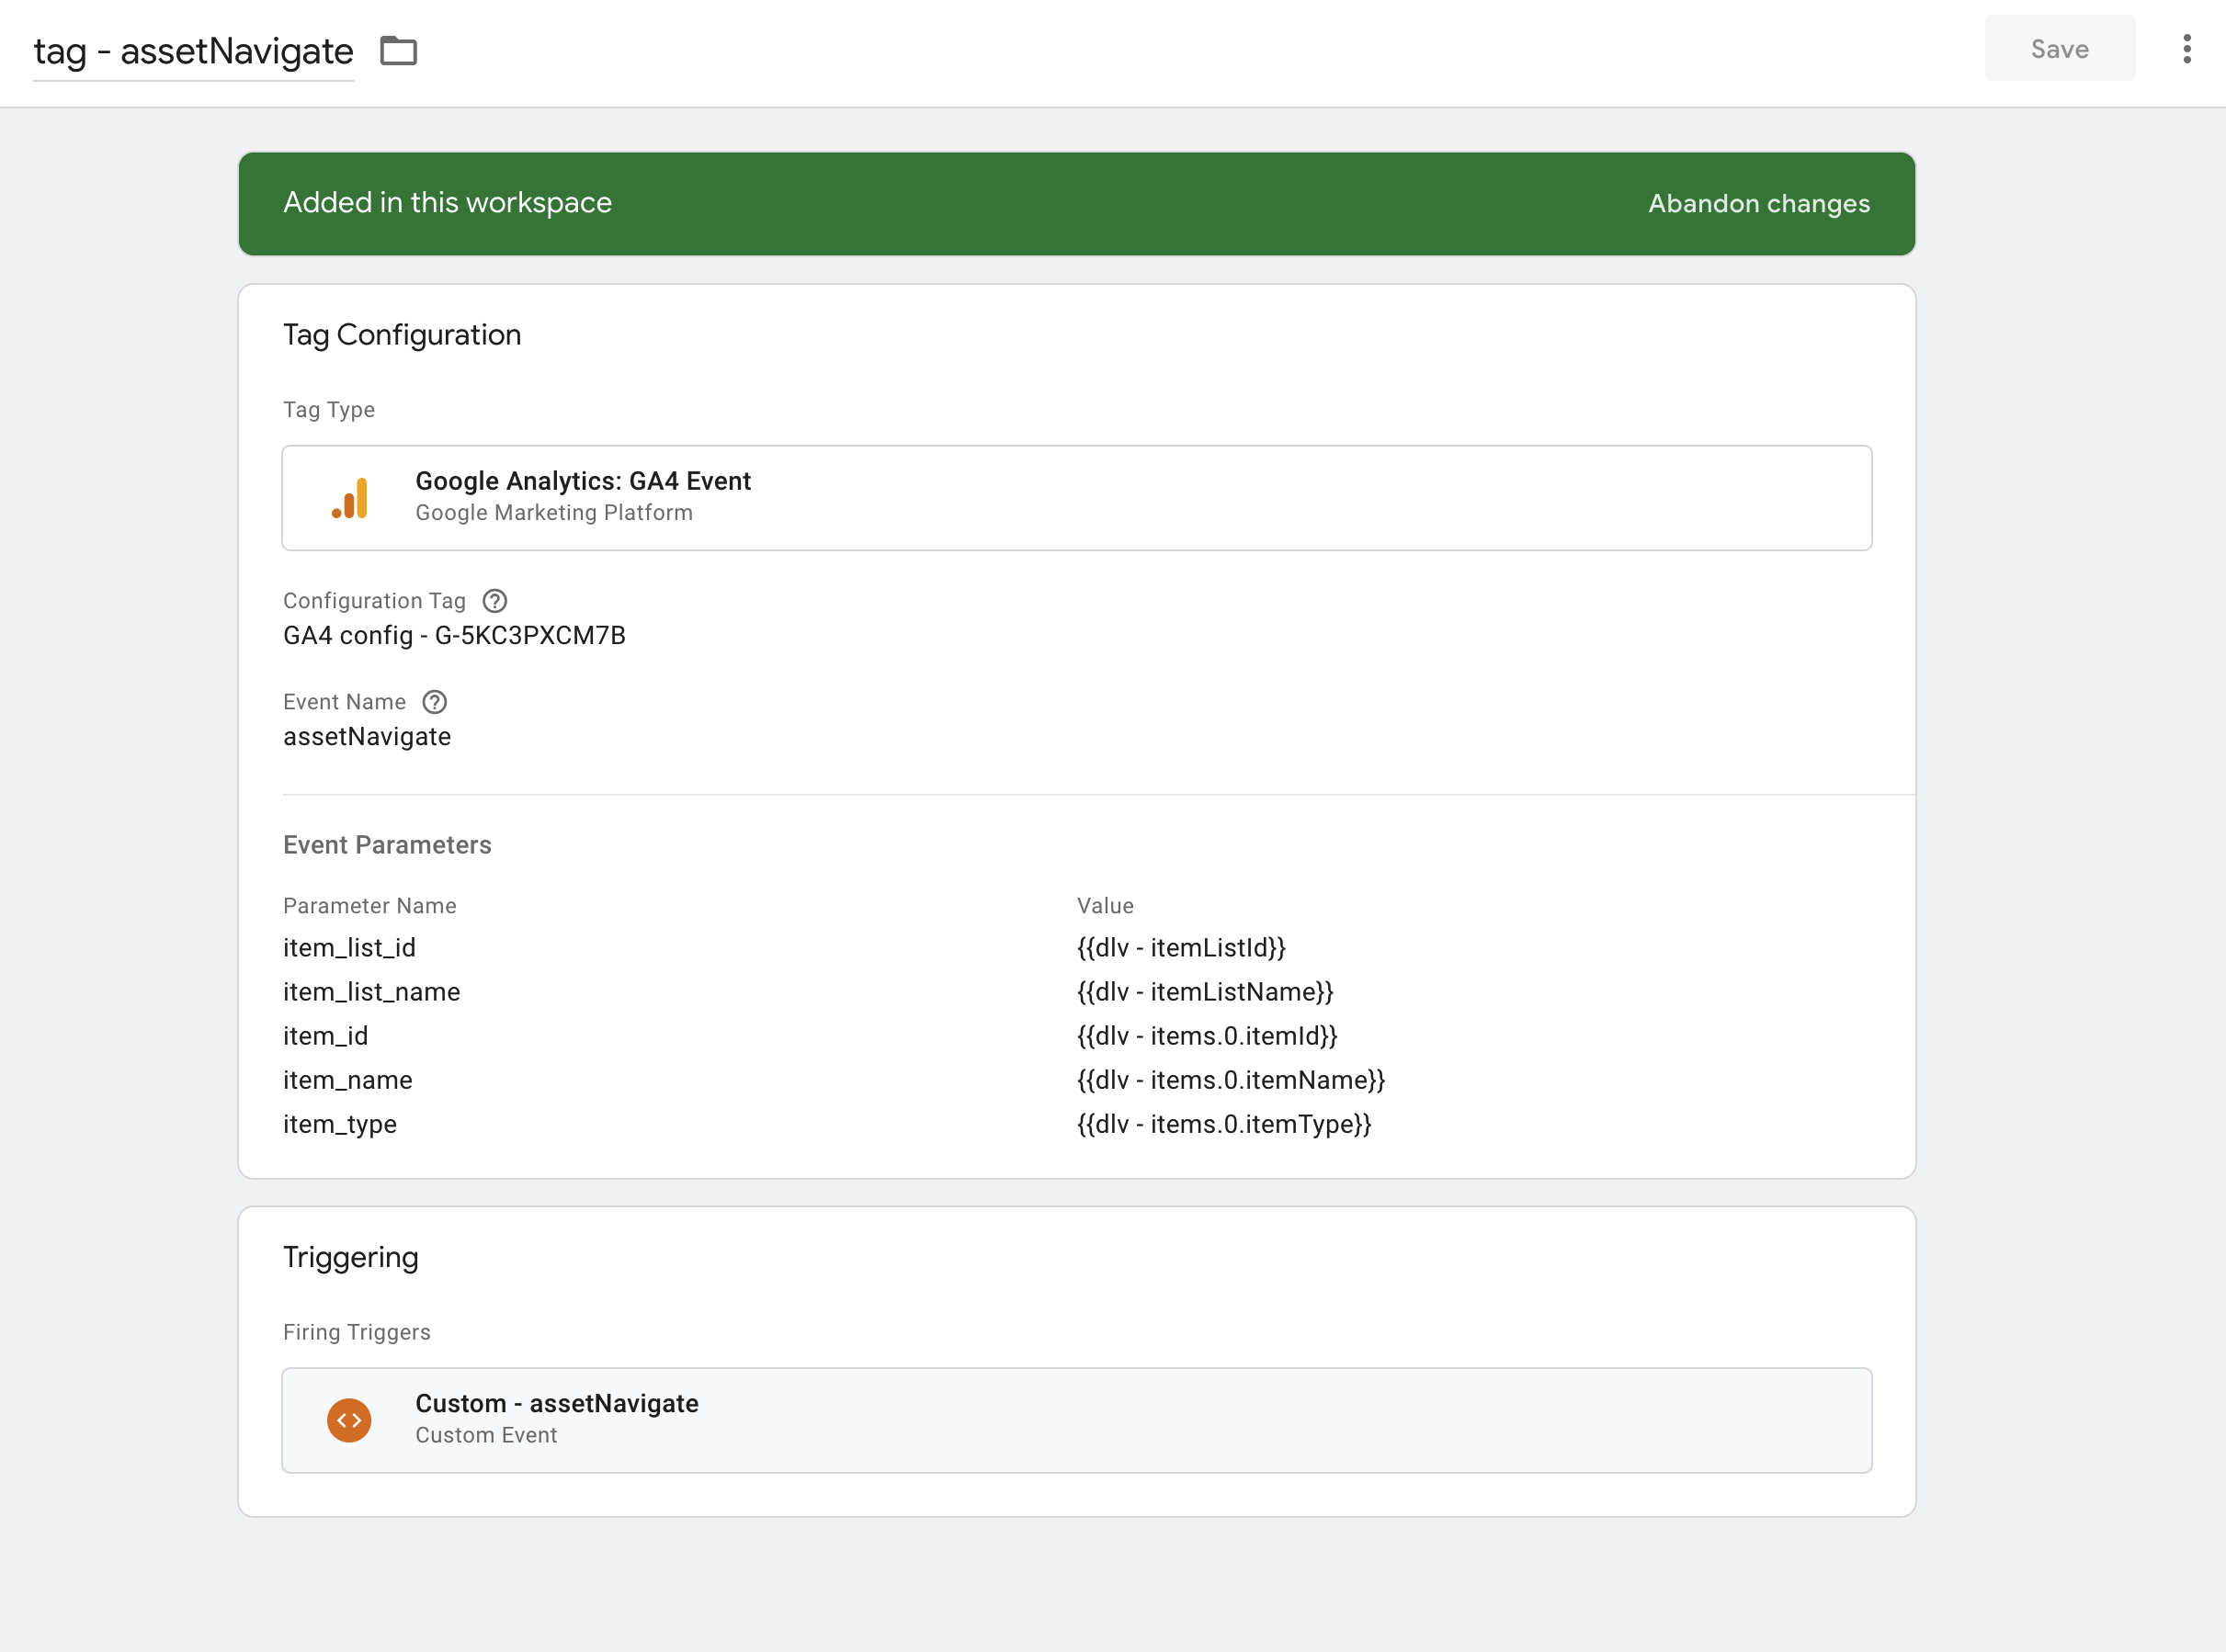
Setting up a tag
When the above steps are done, you should quite easily be able to setup the custom tags you want to fire when any of the custom event names are present in the data layer.
- Go to your tag manager workspace.
- click on
Tags - click
New - Choose a name for your tag in the top left corner where it says "Untitled Tag". We prefixed it with
tag -but that is up to you. - Click on
Tag Configuration - Choose
Google Analytics: GA4 Event - Select your configuration tag under "Configuration Tag"
- Type the Event name you want to fire on, see the table below for available event names. Make sure it matches the typing. i.e
assetNavigate -
Click on
Event Parameters9.1 Click onAdd Row9.2 Type the suggested tag variable name from the table below (or a name that makes sense to you) 9.3 Click on the +-sign next to the value input 9.4 select the correct data layer variable from the table below that corresponds to the event you are capturing. -
click on
Triggering - Select the Custom Event that matches what you are wanting to capture.
- Click
Saveand your Tag is ready to be triggered. - Make sure that you publish your changes by clicking
submitin the top right corner (after your tag has been saved).
When it is done, it should look something like this:
Attn!: You need to set up 'Event Parameters' for every value you want sent to Google Analytics 4 when a tag is triggered. If not, no data will be sent regardless if the tag fires or not.
See the table below to find out what data layer variables you should set up to track the actions of your choice.
Custom data
We are matching the suggested format from Google. They do not however always make sense in the contexts of our platform. You can look at the table below for details on what data is to be expected under the different keys in the data layer. When firing a tag, you need to set up the event parameters in Google Tag Manager
| Event name | Object key | Object value | datalayer variable | suggested tag parameter | description |
|---|---|---|---|---|---|
login |
method |
firebase, oauth, userAccount |
method |
method |
kind of authentication |
login |
userLocation |
country code |
userLocation |
user_location |
only possible to track user account signup |
signup |
method |
firebase, oauth, userAccount |
method |
method |
kind of authentication |
signup |
userLocation |
country code |
userLocation |
user_location |
only possible to track user account signup |
assetNavigate |
itemListId |
string |
itemListId |
item_list_id |
id of component rendering the asset card / herobanner |
assetNavigate |
itemListName |
string |
itemListName |
item_list_name |
title of component rendering the asset card / herobanner |
assetNavigate |
items |
[] |
items |
items |
A list of objects containg details regarding the asset |
assetNavigate |
items[0].item_id |
string , no asset id |
items.0.itemId |
item_id |
Asset id or Herobanner id |
assetNavigate |
items[0].item_name |
string , no asset name |
items.0.itemName |
item_name |
Asset name or Herobanner name |
assetNavigate |
items[0].type |
heroBanner, categoriesCard,carouselItem,gridItem,listItem |
items.0.itemType |
item_type |
The kind of asset that was clicked |
assetNavigate |
userLocation |
country code |
userLocation |
user_location |
only possible to track user account signup |
assetInteraction |
action |
watch, favorite, unFavorite, followTag, unFollowTag , addToCalendar |
action |
action |
How did you interact with the asset |
assetInteraction |
itemId |
string |
itemId |
item_id |
The id could be a tag id or an asset id |
assetInteraction |
userLocation |
country code |
userLocation |
user_location |
only possible to track user account signup |
beginCheckout |
items |
[] |
items |
items |
A list of objects containg details regarding the product offering |
beginCheckout |
items[0].itemId |
string |
items.0.itemId |
item_id |
Product offering id |
beginCheckout |
items[0].itemName |
string |
items.0.itemName |
item_name |
Product offering title |
beginCheckout |
items[0].type |
rental, subscription, purchase, event |
items.0.itemType |
item_type |
The kind of product offering that was selected |
beginCheckout |
items[0].currency |
string |
items.0.currency |
currency |
Currency of the product offering |
beginCheckout |
items[0].value |
number |
items.0.value |
value |
Price of the product offering without fraction digits if decimal is 0 |
beginCheckout |
itemId |
string |
itemId |
item_id |
Asset id |
beginCheckout |
userLocation |
country code |
userLocation |
user_location |
only possible to track user account signup |
purchase |
transactionId |
string |
transactionId |
transaction_id |
Purchase id of the transaction |
purchase |
currency |
string |
currency |
currency |
Currency of the product offering |
purchase |
value |
number |
value |
value |
Price of the product offering without fraction digits if decimal is 0 |
purchase |
items |
[] |
items |
items |
A list of strings contaning the id of the product offering |
purchase |
items[0].itemId |
string |
items.0.itemId |
item_id |
Id of the product offering |
purchase |
userLocation |
country code |
userLocation |
user_location |
only possible to track user account signup |
share |
method |
native, twitter, facebook |
method |
method |
The plattform that the user intents to share to, by clicking the share button. It doesn't actually mean that the share was made |
share |
content |
asset |
content |
content |
The type the user is planning to share. For now, only assets are availble |
share |
item_id |
string |
itemId |
item_id |
Id of the asset the user is planning to share. |
share |
userLocation |
country code |
userLocation |
user_location |
only possible to track user account signup |